my Crafty Corner

Cards and other handicrafts made by Jean Straw

Wednesday 29 November 2017

Last Rudolph Day For This Year

Hello, here I am late again for the Rudolph Day Challenge, ( the last one for this year, oh my! how quickly the time goes by these days.) Once again my card card was ready in time but I just haven't got round to posting it till now. I've been too keen to spend time in the sitting room keeping warm this week as the temperature around here has taken a bit of nosedive lately. Nice bright days though, so not all bad.
Anyway here is my card.
All of the stamps are a small
set from Inkylicious. I used
Gathered Twigs Distress Ink for the stamping and used a water brush to draw in  some colour on the birds and bird box. I added a little red colour to the birds with a Zig Clear Colour water brush, and used a white gel pen to colour the snow, and then added some loose glitter, sticking it with a glue pen. The greeting which is also part of the stamp set looks brown in the photo but I used a red ink pad, I think it might have been a Versafine one. I stamped it onto a snippet of blue card because it made me think of a bright blue sky on a frosty day. I mounted it onto another snippet of darker blue card  and then onto a 15cm square base card which I had embossed the front of, using a falling snow EF. ( sorry I don't remember the make.) The snowflakes were cut with X-cut punches from some tiny snippets of smooth glitter card.

I am entering this at The Rudolph Day Challenge - Any Christmas Item
and at Pixies Snippet Playground - Use Snippets

Thank you for taking time to visit my blog and for your comments, I really appreciate all of them.

Jean


Monday 13 November 2017

A New Arrival

Good evening every one I have some happy news today, my Granddaughter's fourth baby girl was born yesterday lunchtime. We are all so happy that she arrived safe and well as it has been a difficult pregnancy. Here is the card that I made for the occasion. The stamped images
are Lily Of The Valley
Stamped with Archival
Watering Can ink, and coloured with Pro Markers and a gold gel pen for the stars. I used the largest die in the Spellbinders Elegant Ovals set to cut the image, and because I have made so many pink baby and toddler cards in the last few years,
(we now have six great granddaughters!!),that I wanted to add a little bit of blue as well this time, so I coloured the ribbon in the picture blue, and inked the edge of the die cut using Broken China Distress ink and a piece of blending foam, and then chose one of the patterned papers with a little blue in it as well. Both papers are odd pieces from my stash, I'm not sure of the make. The bottom of the pink one is cut with a Fiskars border punch and all the cut edges are inked with a matching blue Distress Marker. I wrapped some pink organza ribbon around before fixing to the 6" square base card. The die cut image is fixed with foam pads and the tiny tags, bow and teddy charm are stuck on with glue dots as are the little Hobbycraft flowers.

Before I go I'd just like to show you these. I saw this crochet pattern in a Prima Makes magazine a while ago and as I knew another baby girl was on the way I just had to have a go at making them. They are somewhat impractical but sooo cute.

I am going to enter my card at
Sweet Stampin' Challenge - Babies

Thank you for visiting my blog today and for your comments, I really appreciate them all.

Jean


Friday 3 November 2017

A Big Butterfly For A Special Birhtday

Hello everyone, as some of you will know my sister Kate recently celebrated her 70th birthday and today I am showing you the card that I made for her.
I used the very large butterfly stamp from Chocolate baroque. I used Black archival ink to stamp it with, and coloured it with Zig Clean Colour brush pens, before fussy cutting it out and giving it a generous coating of Wink of Stella. I found a piece of pink card that went with butterfly colour and cut a mat slightly smaller than the 6" square base card. The embossed panel was cut from a sheet given to me by a craft friend, so I am afraid I don't know what it is called. The greeting is die cut using Britannia dies. I cut each one four times, three from white card and one from pink, (all backed with Stick It adhesive) and layered them up for dimension. I am happy to say that for once this went well and they all stacked up nice and neatly. Lastly I fixed the butterfly in place with silicon glue, and placed a tiny flower gem to dot the i.

I am entering this at
       Emerald City Craft Challenges- Challenge 5 - Always Anything Goes
       Simply Papercraft - Challenge 52 - Always Anything Goes

Thank you for your visit here today and for your comments, they are really appreciated.
Jean

Thursday 26 October 2017

Baby cards For Rudolph Day


Hello, I am back from my lovely break in Spain with my sister, enjoying nice warm sunshine. It was back to reality on Monday when I came home to a chilly, grey and drizzly day, but having got the washing out of the way I made time to make these two cards for the Rudolph day challenge. They are tiny 4" square cards and were made with stamps from the free set with Creative Stamping magazine.The baby image is stamped with Memento black ink and coloured with Derwent Coloursoft pencils and sparkly gel pens. The mats are cut from lovely smooth glitter card that was given to me by my sister. I used circle dies from two different sets that were bought from The works on-line. The background papers are from my stash, cut to size and fixed to the card, and then I used my Tim Holtz stamping platform to position the sentiment. I stamped with the black ink but I didn't like the look of it much so I traced over it lightly with a sparkly gel pen to match the mat colours. If you click the the photo to enlarge it I think you will be able to see the sparkle. To embellish further I added a little teddy bear to one card and a tiny stamped and die cut bow to the other.

I am entering this in the Rudolph Day Challenge at Scrappy Mo's - Anything Christmas Themed. ( only one more RD challenge this year )

Thank you for you visit here and for your comments, they are really appreciated.

Jean

Wednesday 11 October 2017

Another BIL Card

Hello again, here is another Brother in law card. All the stamps used here are from a set that came with the Creative Stamper magazine a couple of months ago. I stamped the boat with  Archival watering Can ink and coloured it with Zig true colour pens and a waterbrush to blend the colours. I cut this and the blue mat with Lil'Inkers stitched square dies. I randomly stamped the wave stamp all over the front of the 15 cm. square base card using Peeled paint and Stormy Sky Distress ink. For the compass stamp I first smooched a small piece of white card with the same green and blue inks and stamped the image with the grey archival ink, adding the gold accents with a gel pen. I cut this and the blue mat with Spellbinder dies, and fixed it to the card with thin foam pads.

Apart from the base card this was made entirely from snippets and so I am going to enter it at Pixie's Snippet Playground - Just Use Snippets.

Thank you so much for your visit today and for your comments, I really appreciate the all.
I am going to visit my sister in Spain on Friday so I probably won't be around to comment much for a week or so but I will try and catch up when I get back.

Jean

Thursday 5 October 2017

Autumn Colour

I have several men's cards needed at this time of year and here is the first one. I used a large leaf stencil for the background, by applying Distress inks with a duster brush. The colours I used are Spiced Marmalade, Aged Mahogany, Vintage Photo and Walnut Stain. Next I stamped the Crafty Individuals tree stamp with Memento Espresso Truffle, and added the birthday greeting with the same ink, using a Gummiapan stamp from Swedish House Crafts.
I cut a mat of dark brown card a little smaller than the 15cm. square kraft base card, and trimmed the image a little smaller again and inked the edges with vintage photo distress ink.

I am entering this at Stamping Sensations where the theme is Autumn Glory.

Thank you for your visit here today and for you comments, I really appreciate them all.

Jean x

Monday 25 September 2017

Rudolph Day Sparkle

Hi! It's time for the Rudolph Day  challenge again, and for once I am ready to play on the right day and in the morning too.This a lovely friendly challenge which runs every month from 25th till the end of the month and is aimed at getting a head start on christmas card making throughout the year. There are only two more RDs this year and I am still behind the target I was hoping for, but I have a nice stash of just over half of what I need so I 'm on the way.
Todays' card is a nice sparkly holly wreath made with a Poppy Stamps  stencil and their clear stencil paste and glitters. I bought the stencil about two years ago at the Birmingham craft show because I liked the lovely card on display. when I asked about how it was done I was told that the stencil paste contains an adhesive which allows the glitter to stick. however when I got home and tried it I realized that it would be difficult to get the different coloured glitters in the right place and after a few disastrous attempts I gave up. While I was at another show earlier this year I visited their stand again and asked the demonstrator how to do it and she told me that she cut an ordinary plastic drinking straw at an oblique angle which makes a pointed sort of nib which makes it easy to pick up a small amount of glitter and drop in the right place. I also watched a u-tube video on their website. I'm afraid I don't know either of these ladies names but between them they helped me to get a reasonable result. I am including a close up here so
hopefully you can really see the sparkle. The backing
paper that I've used is a printable download from
LOTV. I printed it onto A4 paper so after cutting it to fit the card I had offcuts which I used to die cut the greeting with a Britannia die. I used gold mirri card for the mat and both the image and the mat were cut with Li'l inkers dies. I added a tiny gem to dot the I and a ribbon bow to finish it. It took a bit of patience and equipment to make so I made three all the same while everything was out.
I'm sorry if this is a bit of a ramble but thank you if you stuck with it. I am now going to link this with the Rudolph day Challenge at Scraps of Life by Scrappymo, where the theme is always Anything Christmas.

Thank you for your visit and for your comments, I appreciate them all.

Jean

Wednesday 6 September 2017

A Big day For A Little Girl

Hello everyone, today I
have got a card to show you 
that I made this afternoon for the eldest of my five little 
Great Granddaughters. She is going to start school  next week and she is really
looking forward to it. How
time flies!!!. She is quite a
bright little girl and we have
enjoyed some happy crafty
sessions together during the 
summer. 
I was ordering stamps from
LOTV recently and I thought
this stamp was perfect for the
occasion. I stamped it onto a snippet of white card with 
Archival Watering Can ink and coloured it with Zig water colour pens. I cut it out using a Spellbinders circle die, and inked the edge lightly with Stormy Sky Distress ink. The sentiment is computer generated and cut with a smaller die from the same set and inked in the same way. The patterned paper is cut from a 6" pad that I have had for ages, I think it is Penny Black. I found a piece of dark blue card in the snippets box which wasn't big enough to cut the backing mat and the scalloped mats, so I cut the square first to fit the front of my 6" square card base, leaving a narrow border, and then cut the larger scalloped mat from the center of it. I cut the smaller scalloped mat from the center of the large one both using Spellbinders scalloped circle dies. I stuck the patterned paper to the blue card and then to the card front. The alphabet ribbon has been in my stash for years and I was pleased to find a use for it at last. The ribbon is quite thick so I tucked it right inside the card by making a slit in the spine and threading it through and secured it inside with sticky tape. I always add a separate insert which hides the ends. To finish I stuck the image and sentiment discs to their respective scalloped mats and fixed the smaller one to the card with double sided tape and the image one with foam tape.

I am going to enter this at Pixies Snippet Playground - Use Snippets
                                                      ( I used my Cuttlebug to do the die cutting)

Thank you for looking here today and for your comments, I really appreciate them.

Jean


Saturday 26 August 2017

Rudolph Day Angels

Hi there, once again I am turning up a day late for Rudolph Day at Scraps of Life at Scrappy Mo's, it's a good job the challenge is open until the end of the month. I actually made a card yesterday but I didn't like it very much so I made this one today using the same stamp. The colours are a bit unusual for me but I have had this paper pad for some time and not used it much so I thought today I'd give it a try. I think the paper is by Papermania and they are all brownish green and brown with a couple of very pale blue and beige ones. I wanted to use ivory card stock to go with these colours, but the only ivory I have is linen textured which is fine for making the base card which is 13cm square, but although I used the reverse side to stamp on because it is slightly smoother, you will see that there are still a few lines especially on the faces which I coloured with pencils.The rest of this LOTV image is coloured with Promarkers, with a yellow glitter pen for the halo and a coat or two of clear Wink of Stella on the wings. The image is cut with a Spellbinder die from the Elegant Ovals set, and the holly with a Britannia die.The little sentiment tags are from LOTV and the green silk ribbon and tiny red gems are from my stash.

Now I will link this up at Scrappy Mo's, for the Rudolph Day Challenge which is always Anything Christmas.

Thank you for your visit here and for your comments which are always appreciated.

Jean


Saturday 29 July 2017

Stencil and Stamps

As I mentioned in my last post I am back this week with my card for the Rudolph day Challenge at the Scraps of Life by Scrappy Mo blog. I'm a bit later than intended but the challenge stays open until the end of the month so I will still make it in time. I was working on another little project which needed to be finished this week and I had a couple of messy painty and cake making sessions with two of my great granddaughters as well. One of them is three and the other nearly five, and looking forward to starting school in September. I have them one at a time as it can be quite tiring, even though I enjoy them being here.
Anyway all this meant that I didn't get round to making my card until today. The base card is approximately 15cm square, tent style. I took a piece of white card  little smaller and using a Clarity stencil and distress inks I added colour with a duster brush. The colours are Iced Spruce, Broken China, Stormy Sky  and Chipped Sapphire. All the stamping is done with Archival Watering Can ink. The main image and the sentiment are Chocolate Baroque stamps, the small stamps are Cardio, and the tiny snowflakes are part of an Art Journey stamp. I used a white pigment pen and white Wink of Stella to add snowy highlights. I outlined the the large circle with Stickles Stardust glitter, and also added some touches to the  images and snow flakes. I cut some blue card just slightly smaller than the card front and stuck the stamped panel to it before fixing to the card. I punched three snowflakes from glitter card using an X-cut punch and fixed them to the top corner.
I'm afraid this is not a very good photo, and I think the card looks prettier IRL, I just can't find the best place to take the pictures lately. It would be easy to blame the camera but I expect it is more likely an operator problem.

Now I am off to link up with The Rudolph Day Challenge - Anything Christmas.

Thank you for looking and for your comments , I really appreciate them all.

Jean


Friday 21 July 2017

Birthday Butterflies

This card is made with one of my favourite butterfly stamps from Chocolate Baroque. I stamped it onto white card with Memento Rich Cocoa ink, and coloured it with Derwent  Coloursoft pencils using Sansodor to blend the colours.  I added green and gold shading to the leafy flourish. I trimmed this down and inked the edges with Broken China DI using a foam blending tool, and then mounted it onto dark brown card. I cut another piece of the brown card to fit the front of a 15cm square base card, leaving a very narrow border. I cut a smaller piece of beige patterned paper and and stuck it to the brown card. Before fixing it to the card front I stuck on a piece of printed ribbon tucking the top end behind the card. The main image was also fixed in place. The sentiment is a Lily of the Valley stamp coloured and mounted to match the butterflies, and stuck in place over the ribbon. I am afraid my photography skills aren't up to much and I'm sure the colours looked better than this in real life.

I am entering this at Addicted to Stamps and More - Anything Goes
                                 Creates and Makes - Anything Goes - Create a Sentiment
                                 Really Reasonable Ribbon - Anything Goes With Ribbon
                                 Emerald City Crafters - Anything Goes
                                 Through The Purple Haze - Anything With Wings

Edited to say, That I would like to also enter this for The Butterfly Challenge
where the theme is M for Matching Pairs and/or O for the Colour of Orange Peel  I have used the orange colour and although my butterflies aren't identical twins I think they may qualify as a matching pair. Thanks for heads up Kate.

Thank you for taking time to visit and if you leave a comment thank you for that too, I really appreciate it.

I hope to be back later in the week with a card for the Rudolph Day challenge.

Jean


Friday 30 June 2017

Last Minute Rudolph Day Post

Once again it is ages since my last post and I am here now to try and get this done before the Rudolph Day Challenge closes later tonight. I actually made my cards last Saturday ready for the 25th but then forgot to take the photo, and since I did, I have'nt spent very much time at the computer, hence my lateness.
The dies used both for the silhouette bauble and the peace word are from Penny Black. I used snippets of navy blue card to cut them from. For the backings I used some snippets of shiny crinkly paper that I have had in my stash for years. It is lovely paper but very thin and not always suitable. here I used double sided adhesive to stick it to some thin card which made it easier to cut. The pine branch which I stamped with Adirondack Bottle green ink is from one of Linda Brown's Eclectica stamp sets for Paper Artsy. I fixed the bauble with thin foam pads and added a little peel off chain to attach it to the branch. I felt the finished card needed something else so I used some of my ancient red peel off lines to make a border. Once again I made two of each colour way so my stock of Christmas cards is growing quite nicely.

I am entering this at Scraps of Life by Scrappymo! for the
                                   Rudolph Day Challenge - Make a Christmas Card.
And as I've used some snippets I'll also go and play catchup with the playmates                                 at Pixie's Snippets Playground - Just Use Snippets.

Thank you for taking a look, any comments are greatly appreciated.

Jean


Thursday 25 May 2017

May Rudolph Day

Hello friends once again, being the 25th of the month it is time for the Rudolph Day challenge at Scraps of Life by Scrappy Mo. You only need to make one Christmas card to enter, but I have made four this time as I was experimenting with this new Penny Black stamp, and also with my new Tim Holtz stamping platform. I used plain white card for the stamping making the four panels from an A4 sheet. I coloured directly onto the stamp with distress markers, colouring just the red parts and then spritzing lightly with water before stamping. I gave it a quick wipe over and then did the same with the green marker, and by using the stamping platform they matched up perfectly. I think I did two with the distress marker and then tried one the same way only using some very old Marvy pens. I must of had them for more than twenty years but most of them still work just fine. For the fourth one I stamped with Memento black ink and then coloured with Zig water colour pens. For all them I added some bright yellow dots to the center and then highlighted them with yellow Stickles.
I made them into two 6" square cards and two A6 size with the opening on the short edge. I found some Christmassy coloured papers to almost cover the fronts and then trimmed the stamped pieces to size and inked around the edges with a blending tool and stormy Sky Distress ink. Using the same ink pad and a very useful wood mounted random dots stamp made by Denami Designs I added the background dots, stamping some of the ink off onto spare paper first. The stamped panels are mounted onto gold very smooth glitter card, and I used the same card to die cut the Joy word using a Penny Black die. I added these to the square cards, and  stamped the greeting that came with the poinsettia onto the smaller cards using versamark ink and embossed with WOW gold embossing powder.

Now I am going to see what Christmas cards every one else has been making during this lovely spell of summery weather we have been having this week. The Challenge is open until the end of the month if you fancy taking part.

I am entering The Rudolph Day Challenge - Anything Christmas
and                   Addicted to Stamps and More - Holidays ( Christmas )

Thank you for your visit and for your  kind comments which I really appreciate.
Jean


Thursday 18 May 2017

Butterfly Layers

Hello, I haven't got around to entering the Butterfly Challenge for  ages,but when I saw that the theme this time is L for Layers and C for cream I thought of this card which I made recently but haven't blogged before. You can enter with either or both elements and as it has both layers and cream colour it seemed like the perfect opportunity.


I started with a 6" x 6" square ivory base card and cut a matting layer from purple card leaving a border. Next came a cream layer die cut with a Lil' Inker stitched die which I stamped twice with a stamp from the Stampin Up set, World of Dreams, using Memento Olympia Green ink. I added a little purple colour with a Zig water colour marker. The birthday greeting is stamped with a Chocolate Baroque stamp and Memento Elderberry ink. The butterfly is die cut with Memory Box co-ordinating dies. The solid one cut from purple card and the open one from cream card backed with stick it adhesive. Once assembled I glued the butterfly just along the body and used foam pads under the wings to keep them lifted slightly. I am sorry this isn't a particularly good photo the colours look much nicer for real.


Thank you for your visit and for your comments, they are all really appreciated.
Jean 

Thursday 11 May 2017

Happy News Day

Hello, today I have some happy news and a cute card to go with it.  On Tuesday morning my Grandson's wife gave birth to their first baby, a little girl. She is our 5th great grandchild, all girls!! Her name is Harper and she looks really cuddly. Unfortunately I will have to wait till later in the summer to hold her as they are living in Cyprus until then.

My card is a white 6" square base with pale pink paper cut to cover the front leaving a tiny border. I cut the bottom edge of it with a Fiskars edge punch and wrapped a piece of pink lace and some narrow ribbon round it before sticking it to the card. I stamped the Lily of the Valley stamp with grey Archival ink onto a snippet of white card and coloured it with Derwent Coloursoft pencils. I added a little sparkle to the stars and hearts with a clear sparkle gel pen. I trimmed it down and used a snippet of pink card for a mat, cutting the bottom edge with same punch to match the first layer.This is mounted onto the card with thin foam pads. I used two old clear stamps for the sentiment, I don't know the make, stamped with the grey ink. Then  I just tied a double bow with the ribbon and attached it along with a little pram charm.

I am going to enter this at, City Crafter Challenge Blog - Arrivals.
                                           Ooh La La Creations- Something Beginning With B
                                           The Cutie Pie Challenge Blog - Ribbon and Rubber
                                            Addicted to Stamps and More - Anything Goes
                                            Pixies Snippets Playground - Use snippets.

Thank you for taking time to visit here I really appreciate your comments.
Jean

Tuesday 25 April 2017

April Rudolph Day

It's time for the Rudolph Day Challenge again already, they seem to come by quicker and quicker every time.
Here is the card I've made this time.  It's a new Penny Black stamp which I stamped with Archival brown ink onto white multi media card. I added a little colour and shading with my new Zig water colour pens. I cut the panel to fit the front of an A6 card blank, using a deckle edge blade in my cutter. Next I used Distress inks, Broken China and Stormy Sky with a duster brush to add some colour around the edges, and then ran a gold Krylon pen along the deckle edge. The greeting is also Penny Black but from a different set, stamped with Versamark ink and heat embossed with Wow gold embossing powder. I used a white Signo gel pen to brighten up the snowy bits and then added a little bit of crystal glitter. then all that was left to do was to stick it to the front of the red card. A nice easy one to make and I will making more like it to build my collection up.

Now I am going to link this up at Scraps of Life With Scrappy Mo for the
           Rudolph Day Challenge - Anything Christmas.

Thank you for taking a look and for your comments, they are all really appreciated.

Jean x

Saturday 8 April 2017

Tulips And A Blanket

I can't believe two weeks have passed since my last post and my good intentions of blogging more regularly have not happened. I have been making some Easter cards, I don't send many, just a few to family and a few crafting friends. I made several similar to this one, with just different colours, and I chose this one to show you as I liked the pink tulips best.  The stamp is from Stamping Up and was borrowed from a friend. The base card is cut from ivory linen textured cardstock, A6 size. I coloured the tulips with Derwent Coloursoft pencils which looks really rubbish on the textured card, until the colours are blended with Sansoda and a paper stump. This has the effect of pushing the colour into the texture yet allowing the texture to show through.  The card was finished with some green silk ribbon and three tiny green pearls.

As promised in my last post I have a
picture of my finished crocheted
Moorland blanket. It is made with an
Attic 24 kit available from the Wool
Warehouse. It represents the Yorkshire moors on a summer day with grass and moss in the foreground blending into the heathery distance and up to the blue skies, and is worked in a wavy stitch pattern to represent the undulating landscape. I have enjoyed making it and am pleased with the way it turned out, and it will make a nice cosy extra layer on cold nights next winter.

I am going to enter my card at Crafting With Dragonflies - Easter Cards
                                         
Thank you for taking time to visit and for your comments which are really appreciated.

Jean


Saturday 25 March 2017

A Cute Card for Rudolph day

I see I've not posted anything here since last month's Rudolph Day Challenge and now it's come round again already. How does the time fly?
I don't generally do cute Christmas cards, but this Penny Black stamp caught my eye when I was ordering something else and I thought it would be fun to colour. I stamped onto white card with Memento black ink and coloured it with Promarkers. The base card is a 4" square ready made. I bought a pack of them in the Range recently, thinking they would be handy for making small Cristmas cards. I die cut the stamped image and a dark blue mat using Lil'inker stitched squares dies. Before sticking everything together I inked the edge of the image panel with Vintage Photo distress ink. As I expected I did enjoy colouring this and so I made a few more. As you
can see I varied them
slightly by using red
instead blue backgrounds,
and on one I cut the image
into a pointed roof shape.
I am going to enter this now at the Rudolph Day Challenge, where all that is needed to enter is to make at least one Christmas themed project or card. It is a lovely friendly challenge, so if you fancy getting a head start with your Christmas cards pop over and take a look.
I hope to come back soon, and next time I have got a picture of my finished blanket.
Jean

Sunday 26 February 2017

Rudoloh Day Candle

Hello fellow Bloggers, it is so long since I posted anything here and I have had a few inquiries as to whether I am OK. Thank you for your concern, and I am happy to say that I am fine, I have just had a break from blogging. We decided to tackle a home decorating project early in the new year which caused some upheaval and gave me practically no time for crafting, apart from my crochet which I could do in the warmth of the sitting room during the cold evenings. I am pleased to say my blanket is about three quarters done and I hope to be able to show you the finished project soon. So now February is almost over and once again the time seems to be whizzing past. I missed last months Rudolph Day challenge, mainly due to to a problem with the computer, as I had actually made some cards using recycled images from some of the cards we received at Christmas.

However I have made two
new cards for the challenge
this month. I am waiting for
delivery of some new
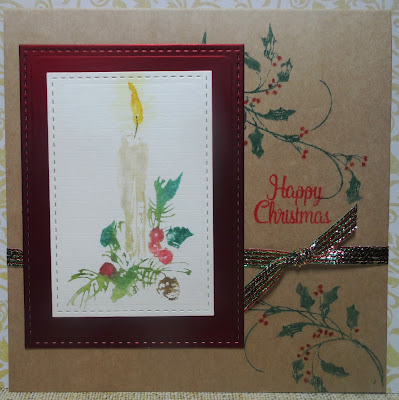
Christmas stamps which I can use next time, but for these I have used two old Penny Black stamps. I love the sketchy style of these. I coloured the stamps with Distress Markers and spritzed with water before stamping onto ivory linen card. I touched up the image a little with a water brush and added a bit more colour in places, like the berries. I cut the image and the mat of dark red satin finish metallic card using stitched rectangle dies from Lil'inker. The base card is a 15cm. square folded tent style, with the holly swirl stamped twice down the right hand side. I wrapped the shiny Christmas ribbon around the front and stamped the greeting before adding the assembled topper.
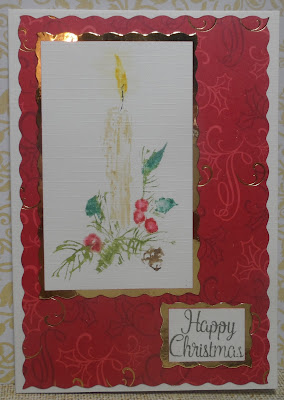
My second card is an ivory A6 size, with the front covered a piece of red patterned paper trimmed to size using a scalloped blade in my cutter. The candle was stamped in the same way as before and trimmed slightly smaller, and mounted onto gold mirri card, also cut with the scalloped edge. I stamped the same greeting, this time with Memento Olive Grove green ink, and mounted it to match. The stamp is part of a magazine freebie set, ( The Creative Stamper, I think.)

If you like to make Christmas cards all year and avoid a panic in December the Rudolph Day challenge is fun to enter, it starts on the 25th of each month and remains open until the last day of the month. You can find it at Scraps of Life by Scrappy Mo. You only need to make one card or project and it must be Christmas themed. I am going to link my cards up there now.

Thank you if you spare the time to visit here and for any comments you leave, I appreciate them all, and will try and return your kindness.

Jean

Saturday 7 January 2017

Elephants


Well here we are already a whole week into the new year and I have to say I am struggling to get back to normal ( whatever that is ) It has been very cold here this week and as I do my crafting in the conservatory I find it too chilly to sit there for very long, even though there is a good heater in there. We live in a bit of a dip and don't get much sun at this time of year, and there has been a couple of very white frosty days this week and the frost just doesn't melt all day. It has been a bit warmer today but it has been very dark and dreary so I'm afraid it is more tempting to sit in the warmth of the lounge with my knitting in the afternoon. This week I have been trying to finish a cardigan I was making for one of my great granddaughters so that I was ready to start a new crochet blanket yesterday. My  daughter gave me the kit for Christmas and the pattern is to be published on Fridays as a Crochet Along on Lucy's Attic 24 blog starting yesterday. I made a start last night making the long starting chain and then the first two rows which form the first stripe.  Now I need to try and get the next 18 stripes done before next Friday. I wonder if I will be able to keep up. Hope fully it will be warmer next week and I can get back to my craft table but in the mean time I am showing you this card that I made for my husbands birthday a while before Christmas and never got around to blogging it.
He really likes elephants so when I saw this art stamp from Imagination Crafts  I just had to buy it. I stamped it with Archival Watering Can ink onto some silver grey pearlised card and then mounted it onto light blue pearlised card. The greeting is from  Chocolate Baroque stamped and mounted to match. The backing paper is from an 8"x 8" pad of oriental designs, I'm sorry I don't know the make or name, but I have had it quite a long time. I trimmed it slightly smaller than the front of a 6"x 6" base card, and embossed the right hand side of it with a Stampin Up embossing folder,Stylish Stripes. I added a piece of striped ribbon at the edge of the embossing before fixing the the image and greeting panels.

I am entering this at Patties Creations Challenge - Use An Animal Image
                                 Seize The Birthday - Anything Goes

Thank you for your visit here today, sorry it has been a bit of a ramble. Thank you too if you leave a comment, I love to read them and really appreciate them .

Jean


Sunday 1 January 2017

The big 50

Well here we are it's the first day of a brand new year,and I wonder what it has in store for each of us. I'll start by wishing health and happy times in 2017 to all my readers here. I have spent very little time at the computer lately and appolgise for my lack of commenting and blogging recently. I am really hoping to make better use of my time this year and get back to blogging more regularly.
This card I am showing today was made for my daughter who celebrated her 50th birthday this week. ( That makes me feel quite old!!) I am sorry about the quality of the photo, it was taken under artificial light. The card is actually ivory and not white as it appears, and looked much warmer. I cut and folded the 6"square card from a sheet of linen textured card, and then found a snippet of smooth card which matched to stamp on. The bear stamp is part of a set from Docrafts which I think I got for a bargain price in the Range some time ago. It's a good set because it has several of bears in different sizes and also lots of little elements which stamp really well and I have found them very useful. It also has some sentiment stamps included too. I stamped the bear with Memento Rich Cocoa ink and coloured it with Derwent Colousoft pencils blending the shades with Sansodor. I coloured the envelope with a white gel pen to make show up better on the ivory card. The image was then cut out with a Spellbinder die from the Marvelous Squares set. I cut a square of patterned paper from a 6"x 6"Papermania pad using a Li'l inker stitched die and stuck it cornerwise onto the front of the card. I stamped Happy Birthday directly onto the card with a Chocolate Baroque stamp and Rich Cocoa ink. The 50th was cut from another small snippet of ivory card using a Britannia die. I coloured all the cut edges including the image and the numbers by running the edge of a dark brown distress marker along them. This is a bit fiddly especially on the small bits but it really adds definition to the edges. When the main image was stuck in place I cut a butterfly from another piece of the patterned paper and stuck it over the original one using silicon glue to raise the wings slightly.

I am taking this with it's couple of snippets to play in Pixies Snippet Playground where there is, as always, a super prize up for grabs.

I am also entering at Penny Black and More Challenge -Anything Goes
                                 Fashionable Stamping - Anything Goes
                                 That's Crafty -Anything Goes.

Thank you for your visit, Please leave a comment so I know you have been. I read and appreciate all of them.
Jean