my Crafty Corner

Cards and other handicrafts made by Jean Straw

Monday 27 October 2014

Blue Angel

Hi again, I have another angel card to show you today. For this one I used a sketch which is the suggested prompt for our cards this month in the christmas card group at Chocolate Baroque. The stamp I used is from Crafty Individuals, stamped with Memento Rich Cocoa ink onto an offcut of white card and randomly sprinkled with a little WOW bright gold embossing powder. I don't know how well this going to show up in the photo but I was hoping to achieve an aged appearance rather than a fully embossed one. I rounded the top corners with a punch and used a duster brush and tea dye DI to shade the background finishing with vintage photo DI on the edges. I added a little colour to the angel with Promarkers, with a touch of wink of stellar on the wings. The music panel is from a 6 x 6 paper pad that I bought in The Works. I rounded the corners  and inked the edges with a versamark ink pad and sprinkled with the gold embossing powder again aiming for a random effect.The base card is a white 5" x 7" and I covered the front with a piece of blue vellum which I had embossed with a Darice snowflake embossing folder, and trimmed the edge with a deckle blade in my cutter. I fixed this to the card with a  double sided sticky sheet, and then added some stardust Stickles to the embossed snowflakes. When all the layers were in place I used a Memory Box die to cut the music from a snippet of gold card And finished off with two snowflakes punched out of the trimmings of the vellum.
I am going to enter this at Crafty Individuals Challenge - Halloween Madness or Christmas Frenzy,
and as I used a couple of snippets, (the gold music and the stamped image), I going to hop over to
Pixies Snippets Playground.


Saturday 25 October 2014

Rudolph Day Angels

Another month has whizzed past and once again it's Rudolph Day at Sarn's blog Stamping for Pleasure, where we are required to make at least two christmas cards. I am pleased to say that  having taken part in this challenge every month this year and also joining in with the christmas card group at Chocolate Baroque I have now made most of the cards I need and I won't have to rush them all in a panic at the end of next month like I usually do. For my cards this time I have used two lovely stamps from LOTV. First, as usual I stamped the images onto white card with black Memento ink, and coloured them with Promarkers. I used a Sakura clear sparkle pen for the wings and stars.The wings do look a bit grey in the photos but they have a lovely shimmer IRL. I cut them out with a Spellbinder die from the Elegant Ovals set. I matted the first one onto shiny blue card from Imaginations Crafts and rounded the corners with a punch. I chose this striped paper to cover the front of the A6 cards because it went well with the matting on both cards. The little holly
sprig is a Clarity stamp that I have had for years and it has been well used. I stamped it with Olympia Green Versafine ink and and used a red promarker for the berries. The greeting is a Chocolate Baroque stamp.
The second card is made the same way but I mounted it landscape style on red Imagination card, and the holly is die cut with a Cheery Lynn die and with some stickles added for a bit of sparkle.
Thank you for taking time to visit and for your comments which are really appreciated.
Jean

Thursday 23 October 2014

Birthday Cheers!

Hi again, I have another birthday card to show you today. In my last post I showed the card that I made for my sister's birthday last week, but two days before that it is also her husband's birthday and this is the card that I made for him. I used the same set of free stamps that I used for Kate's card. There is an Italian theme to this set of stamps but I think some of the images work just as well for Spain where they live which is why I chose them. I stamped the design onto a snippet of Kraft card  with black Memento ink and coloured it with Coloursoft pencils. I used Sansodor and a paper stump to blend the colours and a white gel pen to make highlights on the grapes. I cut a frame from a piece of shiny red Imaginations card using Spellbinders Marvelous Squares dies. The patterned paper is from a Penny Black 6x6 pad, I thought it looked a bit like tiles. It is matted onto the same red card. The banner and greeting are both in the same set of stamps, I stamped the banner onto the red and the  the kraft card and then stamped the greeting onto the kraft one. I cut them out cutting the ends off the kraft one and stuck them together. I fixed the patterned panel across the 6x6 kraft base card and then fixed the main image and the banner with foam pads.
I used some snippets for the main stamping and for the banner so I am paying a second visit this week to
Pixies  Snippets Playground.
I am also entering at Natalie and Amy's Challenge - Colouring on Kraft.
                               Simon says Stamp - Get Crafty and use Kraft
                              Ruby's Rainbow - Use Your Freebies/Prizes, I used free stamps from Creative Stamper magazine and the patterned paper pad was part of a prize at Stamping Sensations.
Thank you for taking time to visit and for your lovely comments, they are really appreciated.
Jean


Tuesday 21 October 2014

Sunny Sunflower

Last week it was my sister Kate's birthday and this is the card that I made for her. These stamps are from a free set that came with the creative Stamper magazine a few months ago. Kate loves sunflowers so as soon as I saw this I knew I would be using it for her birthday card. As usual I started by stamping the main sunflower onto a small piece of white card with Memento Rich Cocoa ink. I coloured it with Coloursoft pencils and Sansodor for blending and then trimmed it to size and used a small corner punch to round  the corners. I shaded the edges lightly with tea dye Distress ink using a blending tool. I used some bronze Frantage for the centre of the flower and then mounted it onto brown glitter card and then onto yellow card. I made a 6" x 6" square base card using  SU Kraft cardstock, and stamped and coloured the small sunflower randomly over the front. I added some brown gingham ribbon and tied a bow  before adding the sunflower panel. I thought it looked a bit bleak so I stamped the single leaf from the small flower twice into each corner and coloured them and I think that gave it a little lift. The birthday greeting is a LOTV stamp and I coloured and mounted it to match the rest of the card.
The brown glitter card and the yellow and white card were all from the snippets box so I am taking this over to Pixies Snippets Playground as I 've not played for a couple of weeks.
I am also entering at Through The Craft Room Door - Anything Goes.
                         and Natalie and Amy - Colouring on Kraft
Thank you for taking time to visit and for you lovely comments which are all really appreciated.


Friday 17 October 2014

Baby Blanket

A quick post tonight to show you this rather brightly coloured baby blanket that I have just finished making. I have done very little knitting or crochet work since I got into paper crafting, but a couple of years ago I  was inspired to take it up again  by my sister Kate's Knit for Africa project  the aim of which  is to make baby blankets and clothes and teddies for use in desperately poor areas in Kenya and Uganda. The first couple of blankets I made were knitted in squares and sewn or crocheted together, but last year  I learned about Tunisian crochet and decided to give it a go, and this is the third blanket I have made using this technique.It makes a nice firm fabric with no holes for the babies to catch their fingers in. The blankets are just one metre square as they are intended to wrap new born babies in, and the mothers also manage to tie them into slings to carry their babies in.
I use bright colours because they look nice and cheerful and they are
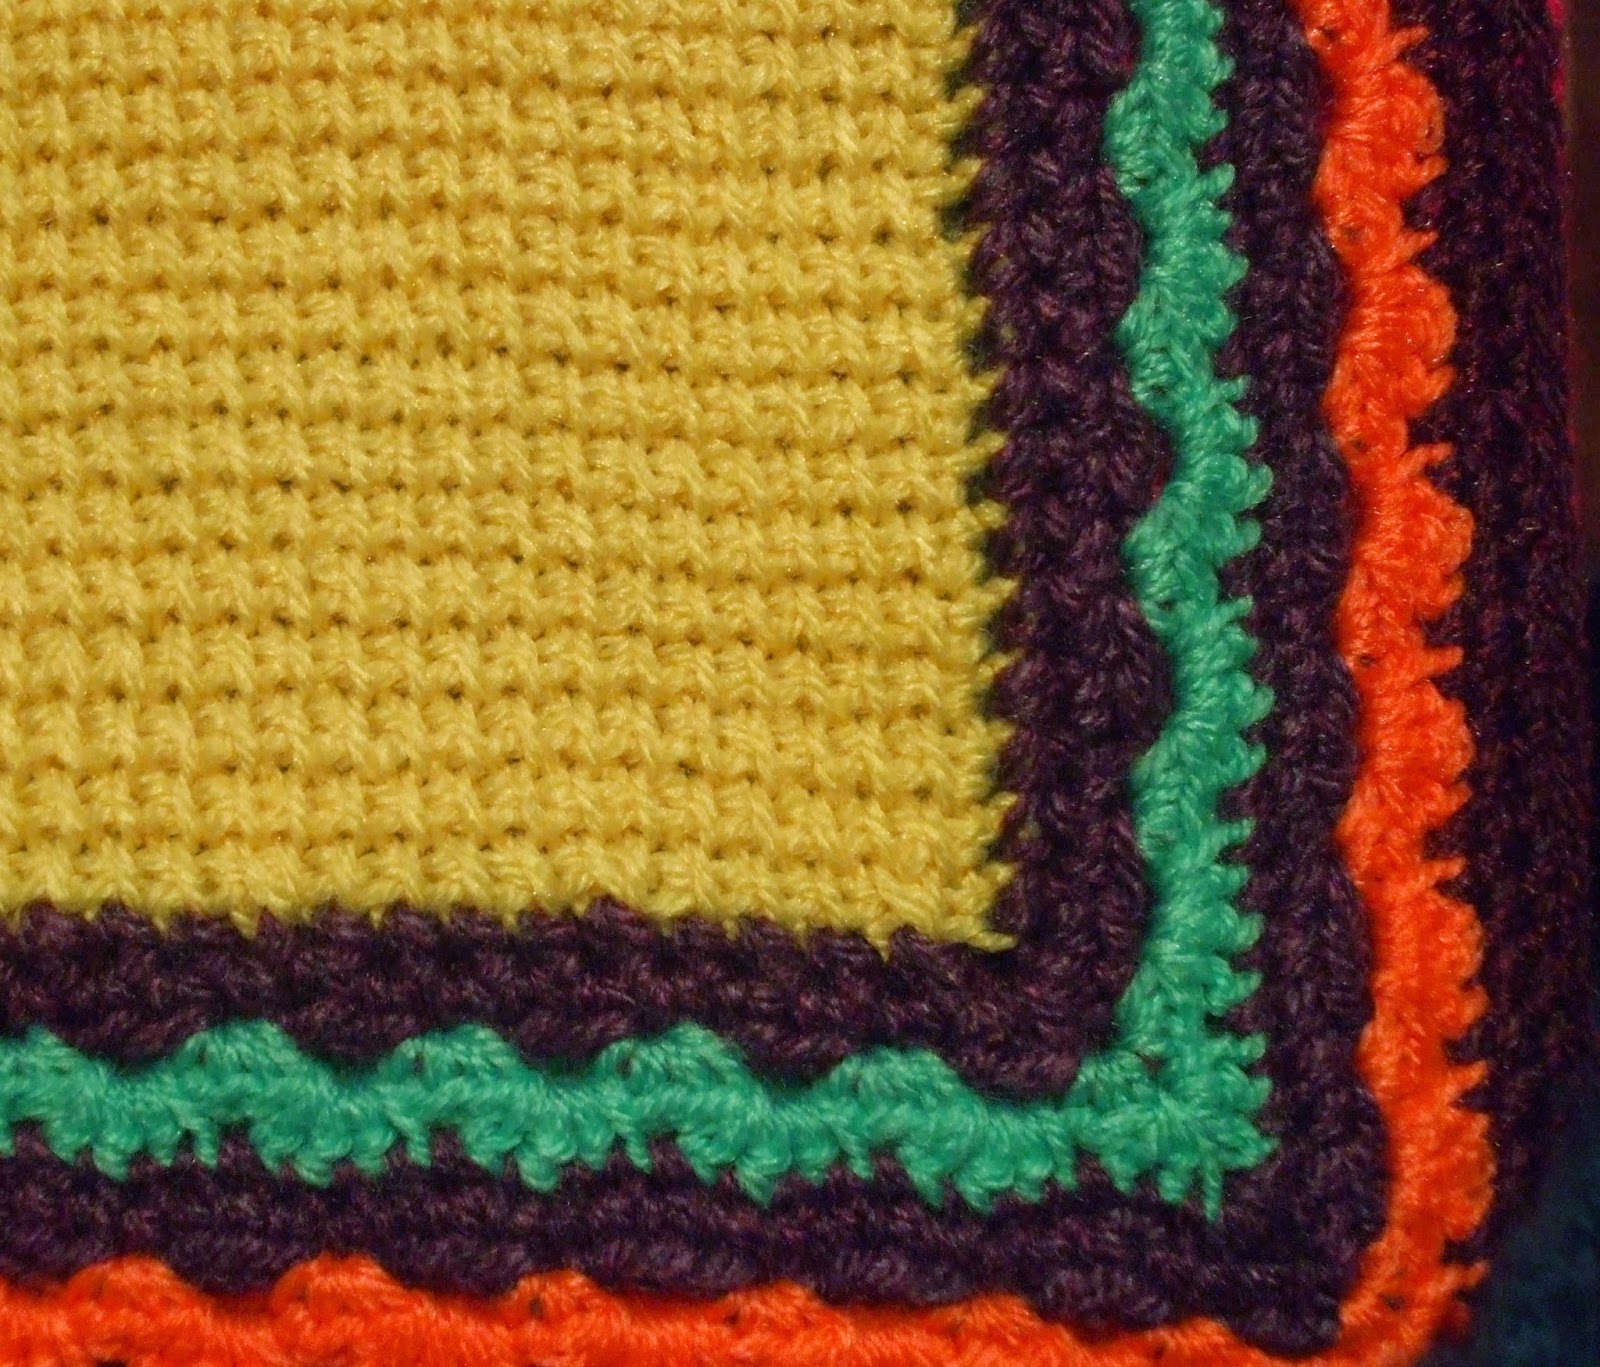
fun to make. Here is a close up to show the stitch effect, this is a basic
 tunisian crochet stitch worked on a 6mm tunisian crochet hook. The
 border is worked in dc with an ordinary hook, a 6mm for the first two
rounds to fit in with the main blanket stitches but when I started to do
the little  pattern bit I realised that it was going to look too bulky and a bit wavy so used a smaller hook for the rest of it.
Between making these little blankets I also knit baby cardigans and hats and sometimes a few teddies to use up odd ends of yarn. I might show you some of these next time I have some ready. I only knit when I am watching TV and as I don't do a lot of that my progress is quite slow. However I have a little cardigan half made and have started another blanket a ripple stitch crochet one this time.
Thanks for taking a look, I hope you enjoyed seeing something a bit different this time. Thank you also for your comments which are greatly appreciated. Jean


Monday 13 October 2014

Butterfly With A Tag

 Hi everyone, first off I must apologise for the poor photo, The weather here has been horrible for the last few days, really dark and dismal with lashings of rain and it was difficult to get a decent picture.  In the end I used a flash and although it was the best representation of the butterfly I could manage it has bleached out the colour of the background which is really a pretty green. I set out to make this card for the Butterfly Challenge Blog where the requirement this time is to use a tag with the butterfly. I began by making the butterfly which is cut from some Brushoed watercolour paper using a Memory box die.As you can see I have both the solid and openwork versions but I can't remember which butterfly it is. For the overlay I used a piece of textured iridescent paper. The base card was made from an A5 sheet of white card that had been cut and I just folded it it in half so it is not quite a DL size, but is a longer than a normal card. The green paper is from a LOTV pad and I cut it with a scalloped blade in my cutter. The bottom edge is punched with a Fiskars edge punch. The patterned tag was cut from the same LOTV pad  using a Sissix die and then I drew round it onto white card and cut a slightly larger size to mat it on. I cut a strip of the patterned paper with a scalloped edge to go across the bottom. All of the cut pieces including the green were edged with a Denim Blue Distress Marker. I tied some blue ribbon through the hole in the tag and across the bottom and then assembled the card adding three punched flowers cut from the Brushoed paper with an XCut punch and finished them with some tiny green gems.
On the right is a photo of the result of my first real play with my Brusho
paints.  Not very artistic I know but I really wanted to see for myself
how all the different pigments show up when they hit the water, it's
fascinating. Particularly interesting is the bright orange powder that immediately becomes lime green as it comes into contact with wet paper. I allowed all of these to dry naturally but then  realised  they weren't going to make very good backgrounds and also there were a few areas where I had dropped a touch too much of the powder and I decided to experiment to see if the colours would still blend if water was added after they had dried. I sprayed each piece fairly liberally with water and I am happy to say that the paint was reactivated and I allowed the colours to run which resulted in slightly  more muted colour washed effect but where the multi colour pigments had split originally they still showed up. I forgot to take pictures of this stage so I hope you can get the gist. You can see the piece I used for the butterfly on the left of this picture, the colours in this are Prussian Blue and Lime Green.
Thank you for taking time to visit  here, I hope I haven't bored you all. Thanks too for your comments I really appreciate them.
I am of course entering my card at Mrs A's Butterfly Challenge Blog - Butterfly With a Tag


Saturday 4 October 2014

Winter Wonderland

Hi everyone I hope you are enjoying the weekend. It started very dark and rainy here this morning but at around lunchtime the sky cleared and now the sun is shining again and the load of washing I did this morning is out on the line and will hopefully be dry by teatime.
Today I have this card to show you that I have made for the latest Crafty Individuals Challenge, titled
Halloween Madness or Christmas Frenzy. I don't make halloween cards so I have gone for the Christmas option. I have had this lovely stamp for a while but not used before and I got the embossing folder free with Cardmaking and Papercraft magazine last week so decided to use both to make my card. I ran a square of white card in the EF through my Cuttllebug and then gently coloured the high spots with a Brilliance Pearlescent Ice Blue ink pad. I carefully cut out the centre by hand leaving a frame. The CI stamp of the children has got some wording and  snowflake around the edge so I masked this off when inking it with Memento black ink and then stamped it onto another piece of white card. I stamped it again on a post it and cut out to use as a mask while I stamped the trees in the background. I used a Chocolate Baroque stamp for this and Versafine Olympia Green ink. I added a little shading with distress inks and coloured the image with water colour pencils. I fixed the frame over the image and trimmed it close to the embossing and then mounted it onto dark blue card leaving a narrow edge, and then onto a white 15 cm square base card. For decoration I punched out some snowflakes with an X cut punch from a snippet of sparkly blue card  and used Stickles Star  Dust glitter glue to add sparkle to the trees, snowy areas and some of the embossing.
Thank you for taking time to visit today and for your comments which I really appreciate.