my Crafty Corner

Cards and other handicrafts made by Jean Straw

Thursday 28 February 2013

Alphatags Return

Hi every one, back at the start of the year I said I would try to get  a picture on here of all the tags that I received in the Chocolate Baroque Alphatag swap that I took part in last year,and here it is.It has taken me a while because I couldn't find a way to take a photo of them altogether and realised that the only way was with a computer generated collage.I didn't have any idea how to do this, but after a helpful Skype chat with my sister last week and a few hours playing about I came up with this. So now I am trying to think of a good way to display this lovely collection. I would love to have them on open display but as my craft area is in our conservatory I find the bright sunlight in the summer months makes things fade too easily, so I will have to make some form of
                                                                                                       album for them. At present they are in a                        
rather classy  chocolate box, and do really quite like having to open something up to take a look at them.

On the left here is a collage of all the tags I made including the ones I didn't get round to blogging at the end of the year. Neither of the collages are in alphabetical order because I just let the computer shuffle the photos about till I was happy with the result.

It was fun taking part and made for some great camaraderie  amongst the participants. I include a special mention to Margaret who organised the swapping, and did a great job keeping us all on track and encouraging us with great photos of all the tags every month.
Thank you for taking time to have a look.
Jean                                                                                                

Sunday 24 February 2013

Birthday Project

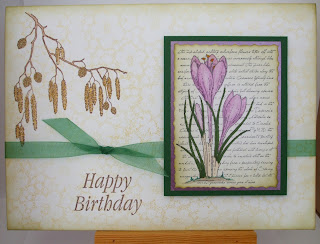
It was my sister's birthday this week and I decided to use stamps from the CB Spring is in the air and Spring Foliage sets again for her card. I stamped the crocus with a script background onto white card with Memento black ink and coloured it with a mixture of Spectrum Noir pens and Coloursoft pencils. I used antique linen and forest  moss Distress inks to tint the background and then trimmed it with a deckle edge cutter. I mounted it onto a piece of purple pearl paper and then onto dark green card. The base card is a 5"x7" white folded card used with the fold at the top and stamped all over the front with a stamp from the CB Texture Fragments with Brilliance galaxy gold ink. The catkins were stamped with memento rich cocoa and coloured with pencils.I tied the green organza ribbon across and fixed the image panel over it with dimensional foam and stamped the birthday greeting at the bottom.

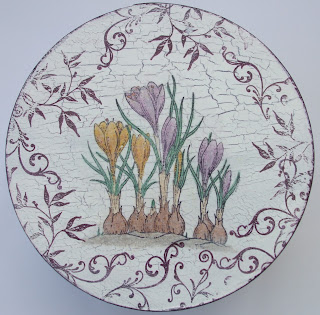
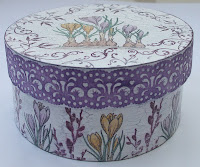
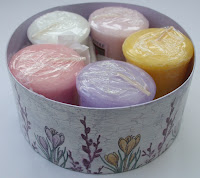
I had a small plain box which was given to my husband on his birthday last year containing little jars of chutney and pickles.  It was very thin wood but apart from a label stuck on  the top and bottom  that both came off very easily, it was completely plain, and I squirreled it away as soon as he had finished with it for altering at some stage.I had given it a coat of white Guesso the other week when I was doing Jenna's J, but still hadn't decided what to use it for. So inspired by the lovely spring stamps and needing a gift for my sister's birthday I decided to see what I could do to beautify the box. I began by painting it all over with pansy and then a coat of crackle glaze. When it had dried I painted it over with snowflake, all the paints are Fresco Finish from Paper Artsy. While I was waiting for the paint to dry I stamped the crocus images onto tissue paper with black Archival ink and coloured them with Coloursoft pencils and then tore  them out. I stuck them onto the top and sides of the box with Matt Medium and when dry I stamped the pussy willow twigs between the crocuses around the sides.I also stamped parts of the flourish stamp from CB Butterfly Flourish Swirls around the edge of the lid,I used Stazon timber brown for this, and also used it to darken the edges slightly. I coloured some self adhesive paper lace with dusty concord Distress ink to decorate the edge of the lid. I mixed a tiny amount of the pansy paint with a lot of white to make a pale lilac colour to paint the inside with, and to finish the whole thing I gave it two coats of varnish.To complete the gift I filled the box with pretty flower scented candles.

I was on a roll now and thought why stop here, I 've got some plain gift bags in my stash that I bought some time ago from Crafty Individuals,so I could make a matching bag. I found a piece of corrugated card and cut it to size and tore it across the bottom and lightly rubbed it over with dusty concord ink and also darkened the edges. I stamped the crocuses again and this time, as I was running out of time I coloured them with Distress Markers.I cut the image out and tinted the edge with forest moss DI, mounted it onto purple pearl card and then onto the inked panel and fixed the whole to the bag. I cut a small tag with a Sissix die and stamped and coloured the small, crocus onto it and then used bundled sage and dusty concord inks to tint around the image, and the back of the tag also, and stamped it with Happy Birthday. I threaded some purple ribbon in the tag and tied it to the bag handle.

I am entering this for Paper Creators Crafts-Flowery Delight
Sweet Stampin-Mother's Day or for a Special Lady ( my sister )

Well done if you managed to stick with this to the end, I appreciate you coming by to look, and thank you to every one who leaves me lovely comments.

Monday 18 February 2013

Snowdrops For A Friend

 Just about now I should be showing you a picture of the Quintiles that I made for the swap at Chocolate Baroque where the theme this month is Valentines. I am not really all that  into Valentines and struggled slightly with what to do, but I eventually managed to get two made and was so pleased to have finished them  that I had  popped them into the post before realising that I had not photographed them.So I apologise for that and hope I remember next time.
 So today I have this card to show you, that I have made for one of
my crafting friends who has a  birthday this week. The stamps I
have used are from two rubber stamp sets recently released by
Chocolate Baroque, Spring Foliage and Spring Is In The Air. The snowdrops are stamped with Versafine Olympia green onto light green card and the stems and leaves coloured with Spectrum Noir pens and the flower heads with a white colour soft pencil. This was then trimmed and mounted onto dark green card.The backing paper is from a Prima Botanical pad and was trimmed with a deckle edged cutter to fit a white base card. I stamped the pussy willow with a brown memento ink and coloured with pencils.The flower panel is fixed with dimensional foam and the birthday greeting stamped with the Versafine green ink.

I am entering this at Make It Monday- Always Anything Goes
Crafty Cardmakers - Blooming Images
Crafty Bloggers Network- Anything Goes.

Thank you for taking a look, I do appreciate your comments.
Jean

Thursday 7 February 2013

Golden Peacock

First of all I see I have some new followers this week so Hi and welcome to my little Crafty Corner, I hope you will keep coming back and that you will enjoy what you see here.Here is the card that I have to show you today.


I got this peacock stamp in a mystery grab bag from Chocolate Baroque some time ago and have never used it, but when one of my friends chose to use at our Wednesday  group the other week I thought that I should try to do something with it too. I was stuck deciding what colour to stamp it with and eventually settled on using this dark grey pearlescent card and stamped the image with fitter glue and added Copper Thunder gilding flakes.I was quite happy with the result so continued to make it into a card.I trimmed close to the image and mounted it onto gold mirri card. I printed the backing paper from the Artylicious Peacock Summer Party  CD and trimmed it to fit a white square folded card. I wrapped the organza ribbon around and tied the bow and fixed the peacock panel over it. I couldn't find any matching ribbon in my stash so decided to use this neutral one because of the gold edging. I think it came from a gift or chocolate box originally, I never throw any kind of ribbon away!. Finally I added the little flower brad to the centre of the swirl on the backing paper. It started out as silver in colour so I painted it with Vintage Patina paints in Victorian Gold and a touch of Cobalt so that it matched. These paints are great for painting metal objects and can make the cheapest metal embellishments look really special.

I am going to enter this at Stamping Sensations- Fur and Feather 
and Make It Monday-Always Anything Goes.

Thank you for visiting and for your lovely comments, I appreciate them all. Jean


Friday 1 February 2013

A First Time For Everything

In this instance the first, is the first time I have ever made a Christmas card in January. I once made one in July for an on-line challenge but my my Christmas card making usually takes place in somewhat of a panic around the middle of November so when Sandra suggested on the Chocolate Baroque forum that some of us form a Christmas card group to encourage each other to make at least one or two cards a month and so spread the load, I decided to sign up and have a go. Sandra even came up with a list of suggestions for themes, the first one being Red and Gold. I know that it is now February but I did just about get this made in time, I just didn't get round to doing the blog until today.
 I did  actually make two but I took a rubbish photo of
 the other one so I haven't bothered to put on here. This beautiful bauble is from a Chocolate Baroque set called Pears and Baubles. I stamped it onto red card with Versamark ink and used WOW Metallic Brass Sparkle embossing glitter to emboss it . I trimmed it down and then double mounted it on gold mirri and red card. The corners on the base card and the sentiment, both CB stamps, were stamped with Versammark  and embossed with WOW gold powder. I stamped three corners of the card and added red gems to the centres. The main image was placed centrally with a ribbon bow added, and the sentiment trimmed and mounted on gold card  and fixed overlapping the image panel in the fourth corner.
I am pleased that I have made a start and seriously intend to try and keep it up each month, hopefully before the last day or two next time.

Thank you for visiting and for leaving your comments they are all appreciated.  Jean